Reverse appliqué is about to become your new favorite technique. Instead of sewing shapes on top of your background fabric like you do in traditional appliqué techniques, you'll be revealing them by cutting away layers to expose the fabric underneath. It creates gorgeous depth and dimension that regular appliqué just can't match!
For the sake of keeping this post manageable, I'm assuming you already know the basics of hand sewing and have maybe even tried regular appliqué. If you haven't yet, no worries - I'd recommend checking out some of my other appliqué blog posts first to get comfortable with the basics!
What Makes Reverse Appliqué Different?
With traditional appliqué, you're adding layers on top. With reverse appliqué, you're working in reverse (hence the name) - you layer your fabrics, stitch around your design, then carefully cut away the top layer to reveal the fabric beneath. The result? A design that sits flush with your background rather than on top of it, creating a really cool inlaid effect!
What You'll Need:
- A prepped/threaded needle - All-purpose thread works great!
- Sharp fabric scissors (and I mean SHARP - this is crucial!)
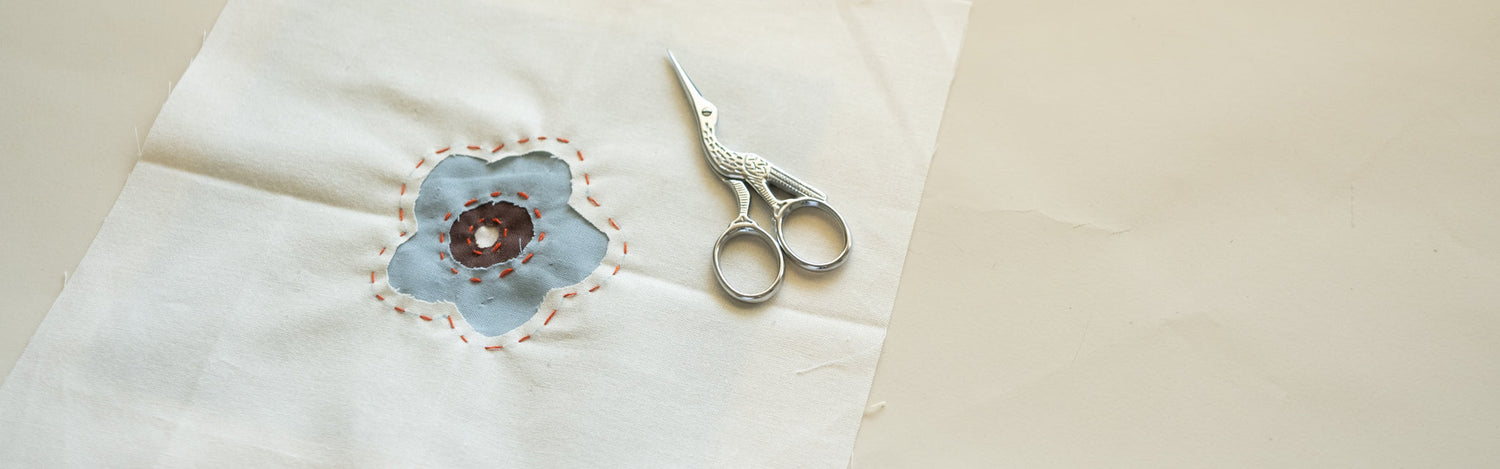
- Optional Small embroidery scissors for detail work
- Printer paper and pen for your template
- Fabric marking tool
- Pins or safety pins
- 2 pieces of fabric in contrasting colors (I recommend starting with quilting-weight cotton in colors with good contrast so you can really see what you're doing!)
Got everything? Perfect, let's dive in!

1. Create Your Template
For your first reverse appliqué project, start with something simple. A heart, a star, or even a basic geometric shape works beautifully! The key is choosing a design without too many tiny details or super sharp interior points (trust me, you'll want to work up to those).
Draw or trace your shape onto printer paper and cut it out. Remember - this shape represents what will be revealed, not what stays on top.
2. Layer Your Fabrics
Here's where reverse appliqué gets interesting! Place your fabrics with RIGHT SIDES UP (both of them!). The top fabric is the one you'll be cutting away, so if you want a blue shape on a white background like I have in the picture, your white fabric goes on top and blue goes underneath.
3. Trace Your Template
Place your template on top of your layered fabrics and trace around it with your fabric marking tool. This line is your stitching line, so make it visible but not so dark that it'll show in your finished piece!
Pin the two layers together securely, making sure everything is smooth and flat. You want zero wrinkles or bubbles here - they'll cause problems later!


4. Stitch Around Your Design
Using a small running stitch or backstitch, sew through both layers of fabric right on the line you just drew. Keep your stitches small and even - about 1/8" or smaller works great! These stitches will hold everything in place and create a clean edge when you start cutting.
Make sure you've stitched all the way around your design with no gaps. Any unstitched areas can fray or unravel when you cut, and nobody wants that.
5. Time to Cut (The Fun Part!)
This is where those sharp scissors become absolutely essential! Working from the center of your stitched shape, carefully poke a small hole in the TOP layer of fabric only. You can use your small embroidery scissors to cut away the top fabric, staying about 1/8" inside your stitching line or leaving more if you desire.
CAUTION!! Do not cut through both layers! You only want to remove the top fabric. Take your time here - it's way better to cut conservatively and trim more later than to accidentally cut through both layers.
As you cut, you'll start seeing your bottom fabric peek through. Pretty satisfying, right?


And just like that you have you basic reverse appliqué complete! If you have more layers to add to that piece you can continue as you did before, saving the top layer for last.


7. Finishing Touches
Once you are done with all of your layers, I recommend flipping over your piece and trimming off any excess fabric to eliminate unnecessary bulk!

Tips for Success:
Test your scissors first! Make sure they're sharp enough to cut cleanly without snagging. Dull scissors will create ragged edges that fray like crazy but if that is the look you’re going for, then more power to ya.
Pre-wash your fabrics to prevent shrinkage and remove excess dye. This is especially important with reverse appliqué since you're working with layers that need to behave the same way!
Choose high-contrast fabrics for your first projects. You need to clearly see the line between your layers while you're working, and the finished piece will have more impact with good contrast.
Don't rush the cutting step. Seriously, take your time here. You can always trim away more fabric, but you can't put it back if you cut too much!
Practice on scraps first if you're nervous. Cut a few test shapes to get comfortable with the cutting technique before committing to your actual project.
What Can Go Wrong? (And How to Fix It!)
If you accidentally cut through both layers: Don't panic! You can patch the bottom layer from behind with a scrap of matching fabric. It won't be perfect, but it's salvageable!
If your edges are fraying excessively: Your scissors might not be sharp enough, or your fabric might be loosely woven. Apply a tiny bit of fray-check just inside the seam allowance to stabilize things.
If the top layer is puckering: You might be pulling your stitches too tight, or you need to clip your seam allowances more frequently (especially on curves).
JUST REMEMBER! The whole point of this is having a creative outlet, and nothing will crush that spirit like holding yourself to impossible standards!! So be patient with yourself, expect some wonky first attempts (mine definitely were), and remember that every piece you make teaches you something new.
0 comments