If you've been looking for a faster way to appliqué simple shapes, interfacing appliqué might be just what you need! This method uses interfacing to create perfectly shaped pieces with clean, finished edges that are already turned for you - no fussy folding required. It's ideal for projects where you want quick, clean results on straightforward designs!
For the sake of keeping this post manageable, I'm assuming you have basic hand sewing skills down. If you're brand new to sewing, no worries - check out my other tutorials first to get comfortable with the fundamentals!
What Makes Interfacing Appliqué Special?
Unlike needle-turn appliqué where you're folding under raw edges as you sew (which gives you the most control over your shapes), interfacing appliqué uses a really clever trick - you sew your fabric and interfacing together like a little pillow, turn it right side out, and BAM! Your edges are already perfectly turned and ready to stitch down.
This method is great for simpler shapes where you don't need as much control - things like hearts, circles, basic flowers, or geometric designs. For more intricate work or when you need precise control over curves and points, needle-turn appliqué is still your best bet!
What You'll Need:
- A sewing machine OR prepped/threaded needle - All-purpose thread works great!
- Sharp fabric scissors
- Lightweight to medium-weight interfacing (doesn’t need to be fusible - just regular sew-in interfacing!)
- Printer paper and pen for your template
- Marking tool
- Pins or safety pins
- Fabric for your appliqué shape
- Fabric for your backing/background
Got everything together? Let's get started!

1. Create Your Template
Draw or trace your design onto printer paper. This method works best for simpler shapes - hearts, stars, basic leaves, circles, that kind of thing! Save your super intricate or detailed designs for needle-turn appliqué where you'll have more control.
Cut out your paper pattern. You will be using the reverse of this pattern to get the right orientation when you flip it right side out!

2. Cut Your Fabric and Interfacing
Place your template on your interfacing and trace around it. Cut it out just enough to make it easier to manage in the sewing phase. Layer it with your appliqué fabric and get ready to sew.

3. Sew Them Together
Place your fabric and interfacing pieces RIGHT SIDES TOGETHER (so the interfacing is against the wrong side of your fabric). Pin them if that helps keep things steady!
Sew all the way around the pattern line you drew. Make sure you stitch completely around with no gaps - these stitches are what creates your finished edge!

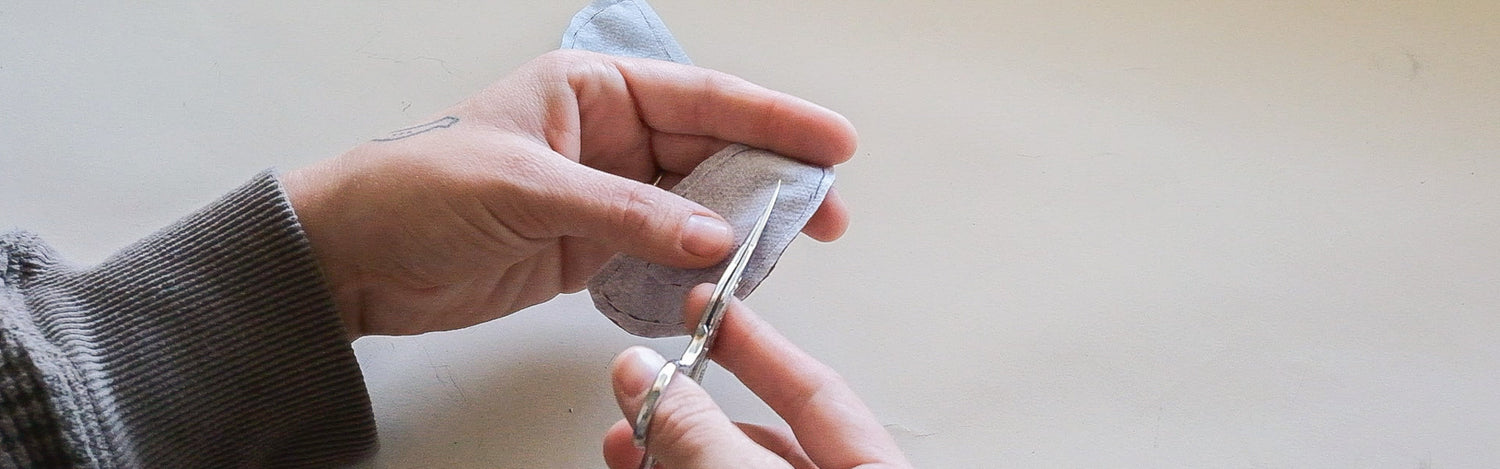
4. Trim!
Trim the excess fabric, leaving about 1/8-1/4” seam allowance.

5. Turn It Right Side Out
Here's where the magic happens! Carefully cut a small slit or hole in the CENTER of the interfacing side only (not the fabric side!). The hole should be big enough to fit your finger through, but not so big that it weakens the piece. Make small snips on any curves to help when turning right side out.
Reach through that hole and gently pull the fabric through, turning the whole piece right side out. The interfacing will now be on the back, and all your edges will be beautifully turned and pressed by the seam you just sewed!
Use a blunt tool (like a chopstick or the back of a crochet hook or a turning tool) to gently push out any points or curves so they're nice and smooth. Give the piece a good press with your iron to set those edges crisp and flat.


5. Position on Your Background
Place your finished appliqué piece on your background fabric, with the fabric side facing up (the interfacing side should be against the background). The slit you cut is hidden on the back, so nobody will ever see it!
Pin or baste it in place, making sure everything is smooth and flat.


6. Stitch It Down
Using a blind stitch or appliqué stitch, sew around the entire edge of your shape. Your needle should catch just a few threads of the folded edge and then go down through the background fabric. Come back up about 1/8" away and repeat!
Match your thread color to the appliqué piece for less visible stitches. Work your way around the entire shape, and when you're done, tie off your thread on the back.
And just like that, you have a beautiful interfacing appliqué piece complete!


Tips for Success:
Choose the right interfacing weight! This is important - if your interfacing is too thin, it can be finnicky and difficult to work with. Medium-weight interfacing tends to work better than lightweight for this technique. Test a few different weights to see what you prefer!
Don't make the slit too big in the interfacing. You need just enough to turn the piece through - a bigger hole doesn't make it easier and can weaken your appliqué piece.
Press thoroughly after turning. A good press really sets those edges and makes stitching down so much easier!
For curves or points, you might need to clip curves or trim points before turning, just like you would when making any turned item. Clip perpendicular to the seam on inward curves, and trim off the points at corners (but not too close to your stitching line!).
What Can Go Wrong? (And How to Fix It!)
If the interfacing is too flimsy: Try a heavier weight interfacing. The interfacing needs enough body to help create and hold that crisp edge!
If points won't turn out sharply: Trim closer to your stitching line at the point (but be careful not to clip your stitches!), and use a pointy tool to gently push them out from the inside.
If curves are lumpy: You probably need to clip the seam allowance more. For inward curves especially, clip perpendicular to the stitching line every 1/4" or so.
If the edges won't lie flat: Make sure you're pressing really well after turning, and check that your seam allowance isn't too bulky. Sometimes trimming it down to 1/8" before turning helps with thicker fabrics.
When to Use This Method
Interfacing appliqué is great for:
- Simple, straightforward shapes where speed matters
- Projects with lots of repeated identical shapes (since they'll all turn out the same)
- When you want a quick, clean result without the learning curve of needle-turn
This method is more about efficiency for simpler shapes than it is about precision for complex ones.
Happy sewing!!
0 comments